Sitecore Marketplace - Quickstart
This guide describes how to start developing for the Sitecore Marketplace locally, by connecting a JavaScript/TypeScript app to Sitecore using the Marketplace SDK.
This guide will have you build an example app using Vite, however, the Sitecore Marketplace SDK is also compatible with Next.js.
We will focus on building a framework app that can work within XM Cloud pages. If you want to run the app as a standalone marketplace app, you will first need to obtain an App ID from Sitecore.
Prerequisites
- Node.js 18+ or 20+
Create application
First, scaffold a new Vite app with the following command.
npm create vite@latest
When prompted, select the following options:
- Framework: React
- Variant: TypeScript
Next, install the required Sitecore SDK libraries
npm install @sitecore-marketplace-sdk/client
We will create a new component that, upon the press of a button, will retrieve and display information about the logged in user context. Create a new component file under /src/components/UserInfo.tsx with the following code
import { useEffect, useState, useRef } from "react";
import { ClientSDK } from "@sitecore-marketplace-sdk/client";

const defaultHostURL = "<YOUR_HOST_URL>";
/* Host URL options:
- XM Cloud full page: https://xmapps.sitecorecloud.io
- XM Cloud page builder: https://pages.sitecorecloud.io
- Cloud Portal: https://marketplace-app.sitecorecloud.io
*/

export default function UserInfoComponent() {
  const [client, setClient] = useState(false);
  const [user, setUser] = useState({});

  const clientRef = useRef<ClientSDK | null>(null);

  useEffect(() => {
    const queryParams = new URLSearchParams(window.location.search);
    const origin = (queryParams.get("origin") as string) || defaultHostURL;

    // Initialize the Marketplace SDK:
    const init = async () => {
      try {
        const client = await ClientSDK.init({
          origin,
          target: window.parent,
          // Extend Client SDK with the `xmc` package:
          modules: [],
        });
        clientRef.current = client;
        setClient(true);
      } catch (error) {
        console.error("Client initialization failed:", error);
      }
    };
    init();
  }, []);

  useEffect(() => {
    if (client) {
      return () => {
        clientRef.current?.destroy();
        clientRef.current = null;
        setClient(false);
      };
    }
  }, [client]);

  // Get the details of the user currently logged in to Sitecore:
  const fetchUser = async () => {
    const user = await clientRef.current!.query("host.user");
    if (user?.data) setUser(user.data);
  };

  return (
    <>
      <div>
        <button onClick={fetchUser}>Get user details</button>
        <pre>{JSON.stringify(user, null, 2)}</pre>
      </div>
    </>
  );
}
Change the value of defaultHostURL on line 4 with one of the following options based on where you want to run the App;
- XM Cloud full page: https://xmapps.sitecorecloud.io
- XM Cloud page builder: https://pages.sitecorecloud.io
- Cloud Portal: https://marketplace-app.sitecorecloud.io
const defaultHostURL = "https://pages.sitecorecloud.io";
Next, include the new component in the App.tsx of your React application. Change the contents of the App.tsx with the following code:
import './App.css'
import UserInfoComponent from './components/UserInfo'

export default function App() {

  return (
    <>
      <h1>Vite + React</h1>
      <UserInfoComponent />
    </>
  )
}
Start your app by entering the following command in your terminal:
npm run dev
Test your Marketplace App
To test your Marketplace App, open the Host URL where you want to run the App (same value as set in defaultHostURL).
Open the browser’s console and run the below JavaScript snippet. Make sure the replace all the variables with values for your demo environment.
- APP_ID = The application ID as provided by Sitecore (for testing purposes as an extension in XM Cloud and Pages you can use a random value)
- APP_TYPE = Use ‘extension’ for XM Cloud and Pages applications and ‘portal’ for Sitecore Portal applications
- YOUR_APP_PORT = The port your Vite application is running on
- YOUR_TENANT_NAME = The Tenant Name of your XM Cloud project
- YOUR_TENANT_ID = The Tenant ID of your XM Cloud project
- YOUR_LIVE_CONTEXT_ID = The Live context ID as found in the Environment’s Developer Settings
- YOUR_PREVIEW_CONTEXT_ID = The Preview context ID as found in the Environment’s Developer Settings
This script works for Page builder (https://pages.sitecorecloud.io) and Full Page (https://xmapps.sitecorecloud.io):
localStorage.setItem(
  "Sitecore.Marketplace.LocalApps",
  JSON.stringify([
    {
      application: {
        id: "<APP_ID>",
        name: "My Marketplace App",
        type: "<APP_TYPE>",
        url: "http://localhost:<YOUR_APP_PORT>",
        iconUrl: "https://www.sitecore.com/static/favicon.ico",
      },
      resources: [
        {
          resourceId: "xmcloud",
          tenantName: "<YOUR_TENANT_NAME>",
          tenantId: "<YOUR_TENANT_ID>",
          context: {
            live: "<YOUR_LIVE_CONTEXT_ID>",
            preview: "<YOUR_PREVIEW_CONTEXT_ID>",
          },
        },
      ],
    },
  ])
);
window.location.reload();
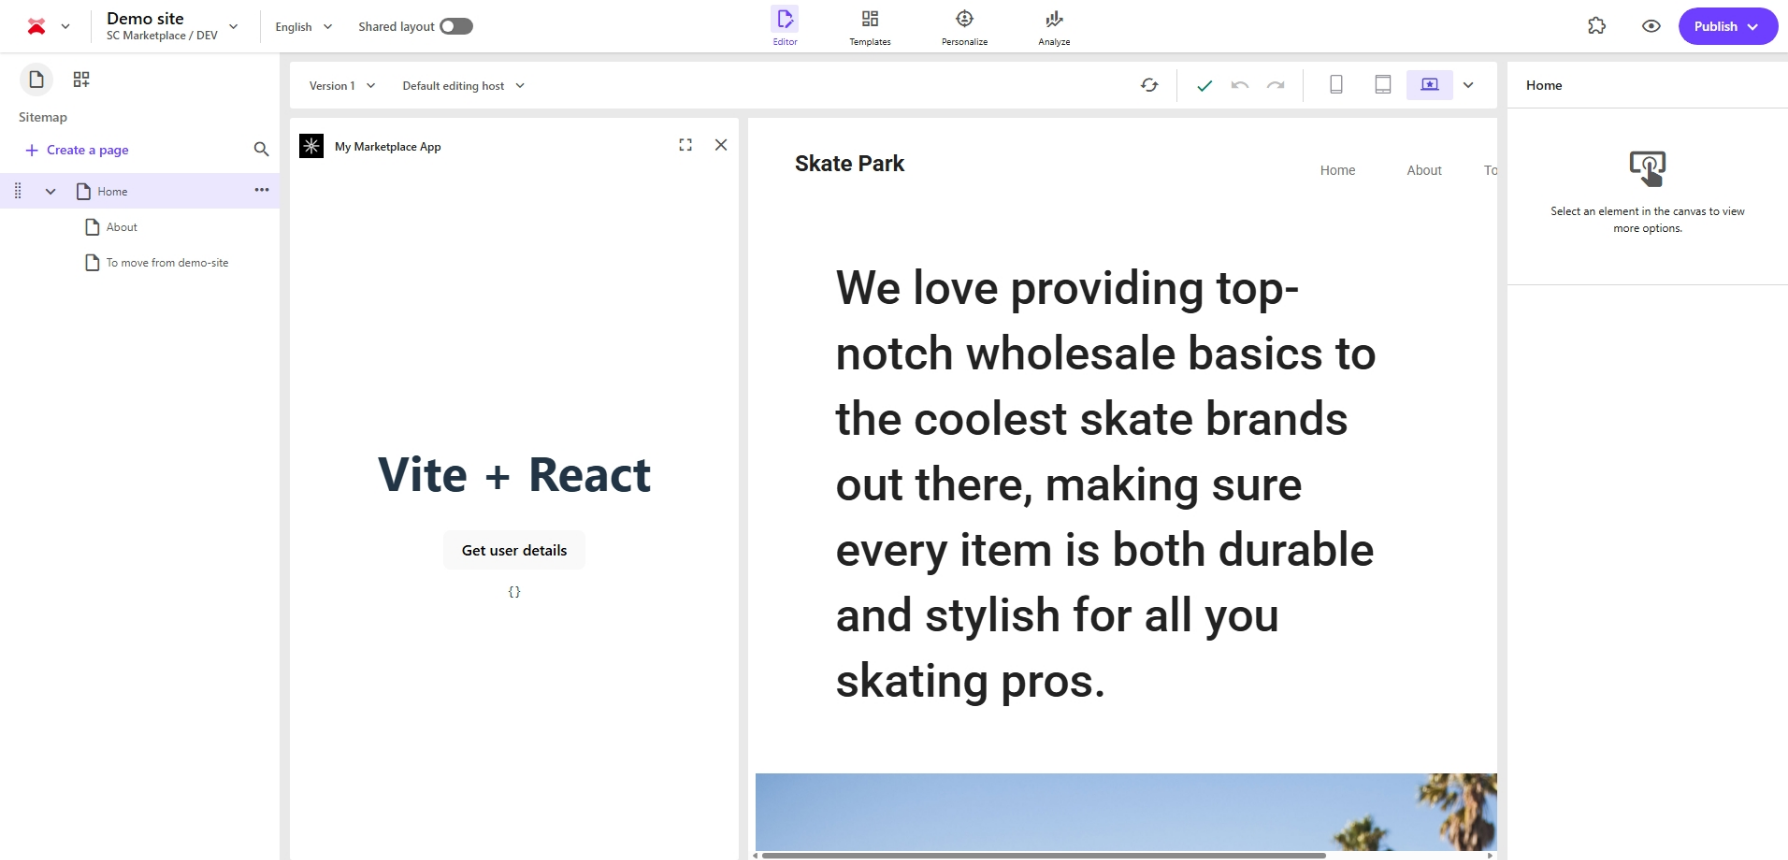
The page will reload, and you will now see a puzzle piece icon in the top right corner of the page, allowing you to open the Marketplace App in the designated page area. This is how it is going to look like in XMC Page Builder:
Retrieving your Tenant ID and Name
At time of writing, there is no easy way to retrieve the Tenant ID and Name values for your XM Cloud project.
To retrieve them:
Open the XM Cloud Dashboard for your Environment with the browser inspector open.
In the network tab, search for a GET request to https://platform-inventory.sitecorecloud.io/api/inventory/v1/tenants
The response of this request will contain the values you need, for example:
{
    "id": "[Tenant ID]",
    "systemId": "...",
    "name": "[Tenant Name]",
    "displayName": "SC Marketplace / DEV",
    "organizationId": "org_...",
    "annotations": {
        "URL": "https://xmc-etc.sitecorecloud.io/sitecore",
        "XMCloud.ProjectName": "SC Marketplace",
        "XMCloud.ProjectId": "...",
        "XMCloud.EnvironmentName": "...",
        "XMCloud.CustomerEnvironmentType": "nonprod",
        "XMCloud.CDPEmbeddedTenantID": "...",
        "TenantClaims.cdp_client_key": "...",
        "TenantClaims.AIEmbeddedTenantID": "...",
        "XMCloud.EnvironmentId": "..."
    },
    "labels": {
        "CustomerEnvironmentType": "nonprod",
        "Environment": "production",
        "ProductCode": "XMCloud",
        "Region": "West Europe",
        "RegionCode": "euw"
    },
    "state": "Active",
    "region": null
}
The “id” and “name” properties are the Tenant ID and Tenant Name values respectively
Next steps
Your app is now running and connected to the Sitecore Portal. Now you can continue developing your app by building out queries using the client package or explore installing the xmc module to work with the XM Cloud APIs.